First: to observe! Also, asking around, making research, contacting geoligical centre, etc. Like this we found out that the substrate was propably marl (from calcareous soil).
Soil texture
Then the first step is to make holes in the ground and feel the soil. By making it a bit humid and rubbing it between the fingers it’s possible to feel the presence of sand (some granular bits felt in between the fingers), silt (velvety feeling) or clay (very soft and sticky feeling). Some tests can also help, like trying to make ”chips” of soil in between your thumb (it you success the soil is pretty clayey), roll a sausage/donut with humid soil (if you can make a full donut without cracks the soil is very clayey), etc. Finally the best to have a very accurate vision is to put a sample on soil in a jar, shake it and let it settled to see the proportion of sand, silt and clay. This is called the soil texture test.
It’s important to make tests in differents spots. In Fontarnau for example, the two terraces where we are making our forest garden are very different; the top terrace has a much more clayey soil than the bottom terrace.
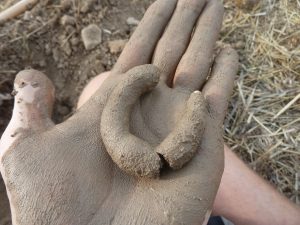
In this photo we can see that the sausage of soil cracks before we can make a donut out of it (we can just make half a donut). The soil is high in clay but still balanced (top terrace soil).
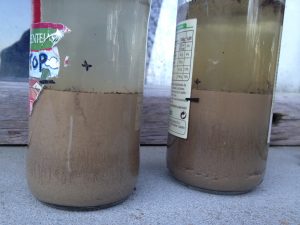
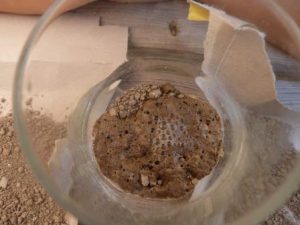
Jar test results :
The top terrace jar test (on the left) shows a percentage of 48% of clay, 16% of silt and 36% of sand. Looking at a soil texture triangle (you can find them online), you can know that this soil is a clay soil, but not that far from a clay loam soil or a sandy clay soil.
The bottom terrace jar test (on the right) shows a percentage of 37% clay, 24% silt and 39% sand. This soil is a clay loam soil, a bit more equilibrate. However we can remember that our two soils have as well a high percentage of small rocks that balance as well the high clay content.
Another observating tip: a clayey soil will also makes cracks in dry period.
Soil horizons
It’s important to analyse the soil horizon. To do that I dig a 30cm cube hole (that will be useful later on for the drainage test). And I look at the side, I disturb the less with my shovel. Then I can observe if there is different horizontal layers of soil depending on their colour, texture, etc. Looking at the colour of the soil gives an indication on the organic matter content. Generally the top layer might be more dark; it means that it has slightly more organic matter. You can look as well if you see any horizontal lines: they are a sign of soil compaction, like made by a tractor for example.
Soil structure
You can look as well at the soil structure (how the soil particles are binding together – the proportion of aggregates, pods) by looking at the soil horizon patterns, and by handling and mooving big chunks of soil in your hands. Finally you can take all the soil you dig out and throw it on the ground, and then look how the soil react: for example, a massive soil –high clay content- will not fall apart, while a very loose soil (with a high sand content) will completely fall apart without making any aggregates. A good heathly soil structure has a lot of aggregates, with a good balance of micropores and macropores, that help the soil to aerate/host life/keep water and nutrients.
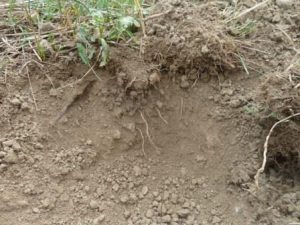
In the top terrace in the summer, we realized that the first 30cm are pretty uniform, even if the top part is slightly more brown and the bottom a bit more grey. We didn’t notice high signs of compactions. The soil structure was pretty nice, with nice aggregates ; indeed the mix of a high clay content and a big presence of around 0,5cm cube rocks gives a good balance for the soil. Note that this soil structure tests might be different when soil is dry or humid.
Earthworm counts
In this 30cm cube of soil that we dug out, it’s interesting to count the amount of earthworms. 20 is a good amount, revelating a good living soil. However, their presence also depends on the humidity of the soil: when we did this test in the summer, with a very dry soil, we didn’t find any earthworms. Then in autumn we did it again and found around 20 of them !
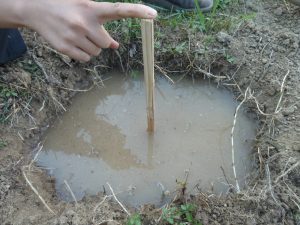
Drainage test
Finally you can fill water in the hole that you dug and look how long it takes to drain out, using any mesuring instrument. If ever it didn’t rain for a while, you can fill the hole, wait 24 hours and fill it again the next day to measure it. In the top terrace in summer, we realized that the water went 5,2cm down in 15 minutes, 6,5cm in 30 minutes (so only 1,3cm more), and 7,5 in 1 hour (1 cm more). The drainage is a bit slow, but for the climate of Vic it is pretty suitable : indeed, the winter (from december to march) is the most dry period, and then the soil don’t get asphyxied by waterlogging situations, and in the same time it retains the water from the autumn rains pretty well during all these months. The big spring rains are then helping the soil to retains water through the summer, of course with a good and thick mulch.
Bio-indicator plants
As well, a good way of analysing the soil is by observing the plants that are the most present on it already. These plants can indicate a special type of soil.
For example in the bottom part of the top terrace , we noticed a lot of Potentilla reptans, that is a sign of compaction in clayey soil. As well we could notice (more sparsely) some Plantago major that also indicates this phenomena. The other parts of the terrace were more rich in Plantago lanceolata and Stellaria media, that are sign of a pretty healthy soil.
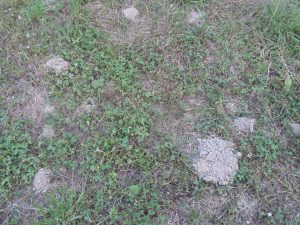
Potentilla reptans in the top terrace
The bottom terrace didn’t have Potentilla but a lot more of Stellaria media. It also had a lot of Amaranth, that shows a nitrogen-rich soil. In general the bottom terrace seems more equilibrate.
It’s important to keep in mind that one plant doesn’t indicate much. The best is to try to calcutate the proportion of each plant on the soil to be sure they really can be representative of the soil.
pH Test
It is important to know the pH of our soil, at least roughly. You can buy a pH test in a garden center or give a soil sample to a laboratory. You can also make more DIY techniques like using a red cabbage, or the one we used, by drying the soil and pouring some white vinegar on it.
It bubbles! And quite a lot. This means that the soil is calcareous and reacts with the vinegar. We know then that our soil is alkaline. We should make further tests to know the exact pH of our soil.
If your soil doesn’t bubble, then try to make it a bit humid and poor sodium bicarbonate on it. If it reacts, your soil will be acid. If it doesn’t, your soil will be neutral.